Oukei / AMDT TW2700-08 Robot Review
(Review by Rich215, published with permission)
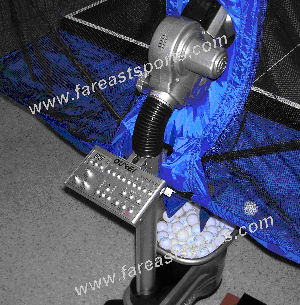
The Oukei/AMDT TW2700-08 table tennis robot is an advanced
2 wheel Programmable robot. With its feature rich control pad, it is the current
top of the line robot of several from Oukei.
The TW2700-08 robot offers a much more advanced Control
Pad over past versions. With the addition of several ball landing controls,
various ways of selecting amount of balls in a sequence (either by the minute or
by amount of balls), random, mixed, and various programmable functions, this
robot has one of the more complex and in depth controllers I have used so far.
Having so many functions and controls with such an
electronic device, Oukei has managed to keep it fairly easy to figure out the
control pad without looking at the manual. Although when you start using the
programming functions of the Control Pad, you might need the manual to walk you
through the steps of operation. Luckily the instruction manual is written in
English and Chinese. The instruction manual is the best one I have seen so far
with robots.
Let’s start of with the Control Pad.
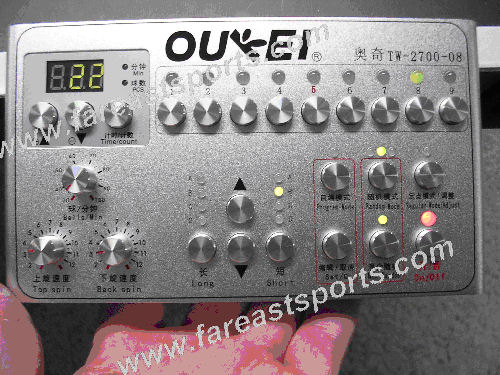
The top and bottom wheels are controlled by circular
variable dial knobs. One dial is for the top throwing wheel, the other is for
the bottom throwing wheel. On average I had the top wheel set about 6 for good
amount of top spin and speed. The bottom wheel setting I used varied from 0 to 5
or 6 with different shot setups. So with those setting numbers, the wheels
provide more than enough speed and spin. Above the wheel control dials, is the
“ball frequency” or balls per minute setting dial. The ball per min control on
this robot is very good. You can make the amount of balls per min very slow for
beginners or certain type shots, or you can speed it way up to multi-ball style
hitting. The numerical readout at the top left on the pad, are the settings for
amount of balls per sequence. The nice added feature here is the ability to set
the amount of balls in either per minute, or per each ball.
The upper right buttons are the 1-9 ball landing area set
with corresponding on/off lights. The lower middle set of 4 depth of landing
area buttons program where the short or long ball will be. Which ever A-D button
is selected for the Long and Short selections, both will then be used in the
“Mixed and/or Random” selection for sequence of shot types. The 2 button set of
“Programming” and “Set” modes, are in the left side red outlined area. These are
used to preset exact 1-9 landing areas and save the sequence. The 2 buttons in
the right side red outlined area, are for selecting “Random Mode” or L to R ball
landing areas, and the bottom button in that area selects the “Mix Random” or
Long and Short random mix. When using the upper Random-Mode button, you can
select the spread width of the landing area in 3 different ways. With the center
light selected (green), you will get a spread of landing areas 1-9. With the
right light selected (red), you will get a spread of landing area from 5-9
across the right half of table. With the left light selected (red), you will get
a spread of landing area from 1-5 across the left half of the table. That’s a
nice fast setup change for footwork drills.
The “Regular Mode/ Adjust” button activates the sequence
with the settings as they are, or when you use the “Adjust” mode it allows you
to change the shot settings for your selected sequence. The On/Off button is
labeled in red in the lower right of the control pad. The buttons are made of
aluminum or some light metal, as well as the metal case of the well laid out
Control Pad. The Control Pad is one of the best features of the robot. It allows
for many varied preset or random set shots.

You can mount the Control Pad on the
extra clamp for use at the hitting end, or on the mount on back of the robot.
This is nice for storage and keeping the pad safe when moving around.
There is an On/Off button situated on
the lower right side of base of the robot. The opposite side (left half) of the
base has the cleaning/inspecting door.
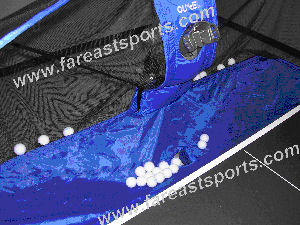
The balls are moved from the collection
tub and upward with a “cork screw” like mechanism attached to the ball pick up
motor. As always, it’s nice to see the various theories of design on the ball
loading mechanisms.

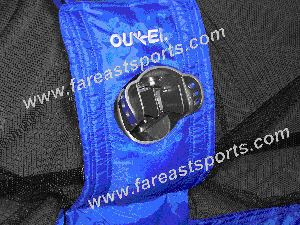
The only other adjustment on the robot
is the throwing head rotation angle setting. The rotation of spin angle is
changed manually buy the overly large metal “palm screw” on the back of the
robot head. The rotation angle of the head is from 0 to 45 degrees. Although you
can actually go just past 45 degrees on each left and right side of this
adjustment, you can not set the rotation of the head to 90 degrees. Side spins
can be set by certain off sets of top and bottom wheel speeds, but I prefer
being able to adjust the 2 throwing wheels at 90 degrees for true side spin at
any interval of the bottom or top throwing wheel speeds. The throwing wheels are
large foam type elements. The robot comes with an extra set, which is an added
bonus.

The TW2700-08 has a “deflector” design of throwing balls,
just like an Amicus. When the robot shoots a ball to the far left side of the
table, the whole head does not rotate to do this. There is a deflector channel
mounted after the throwing wheels that makes the ball angle to the right side
across to the left side of the table. The deflector also changes the vertical
output (high and low head setting) of the shot as well. Both these 2 settings
for head angle, Left to Right, Long to Short, are controlled by separate buttons
on the Control Pad.
 One
difference between this robot and say the Y&T 989E, is the fact that you have to
change the up and down vertical setting of the head with the 989-E at the robot
end. You can change this vertical angle of the head at the Control Pad with the
TW2700-08. One
difference between this robot and say the Y&T 989E, is the fact that you have to
change the up and down vertical setting of the head with the 989-E at the robot
end. You can change this vertical angle of the head at the Control Pad with the
TW2700-08.
Since the ball bounces off the walls of the deflector
slightly, I think you tend to loose a bit of spin off the ball. Can you simply
compensate that with more wheel speed? Because of this type of deflector head,
there is a bit more “operational noise” with the Oukei robot compared to a Y&T
robot.
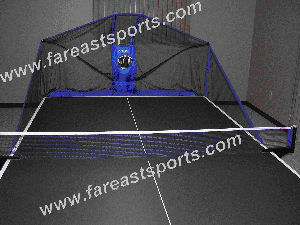
The Catch Net is fairly close to the
same design as the Y&T robots, but with slightly less “bounce back” from the
area around the throwing head section. However, the side nets cover just
slightly less area from mid table to the net because of their unique design not
yet found on most robots.
The side nets are attached to the table
buy the net without any extra clamping devices. This is really nice when it
comes to setting up and taking the robot down in a hurry. The forward side net
attachments simply loop around the net clamps with a Velcro strap. The side nets
also fit the best on the table edge compared to a few other robots, as it left
no gaps. The catch net has a nice big span as well. With all catch nets, this
one needed some minor adjustments, but not much.

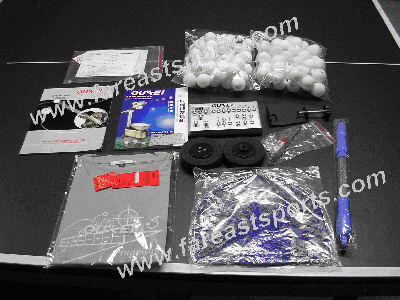
Here is what you get from the manufacture in the package
with the Oukei AMDT TW2700-08 robot.
-Robot documentation papers.
-Oukei catalog of products.
-Instruction manual in Chinese and English Language.
-2 bags of Double Fish 1 star balls (approx. 100)
-Advanced Control Pad and full length connection cord to robot.
-Mount clamp for Control Pad.
-2 extra throwing wheels.
-2 small Phillips screw drivers and 2 extra inline fuses.
-Ball pick up net.
-A cool Oukei XL t-shirt.
From what time I got to spend on the AMDT/Oukei TW2700-08
robot, I really liked this robot a lot. It excelled in the control pad functions
and build quality. This robot would be a good robot for someone that wants to
get as much as possible from any robot in its price range. It is very quick and
simple to setup and take down. Kids, beginners, or advanced players will find
this robot easy to use at what ever level is needed.
I must say, it would be very hard for me to pick between
this robot and the Y&T 989E robot. The 989E excels at the spins and shots
thrown, while the TW2700-08 excels more with the random function and control pad
adjusting for the heads up and down setting. Both robots are great choices and
are close in price. Also remember this robot comes set up with China Standard
Electric supply and cord. (220 volts, 50HZ). So you will need a voltage
converter to transform to 110 voltages if needed.
Overall, I give the TW2700-08 robot an 8.5 out of 10
rating.
|